One of the weirdest things about gluten-free brewing is that two brewers making the same beer often need very different enzyme doses to get to the same result.
Why is that? At first blush, you would think something like enzyme dosing would be pretty standard, since X amount of enzyme converts Y amount of starch—and under ideal conditions, that’s certainly what we see. But as it happens, the brewhouse introduces several variables that can throw a wrench into the process.
I’ve spent quite a bit of time trying to unravel the real-world factors that impact enzyme dosing. Below, I’ll explain what I’ve found and provide a few tips for figuring out the right dosage for your situation.
TL;DR
If you don’t want to get into the weeds, or if you’re just starting out and need some advice on enzymes, here are some baselines that have worked for most people:
- 1 ml/lb liquefaction enzyme (e.g. Termamyl, Ondea Pro, Sebayml BAL)
- 1 ml/lb saccharification enzyme (e.g. AMG, Fungamyl, Ceremix Flex, Sebamyl L)
Pick a mash temperature that’s appropriate both for the gelatinization of your grist and for the enzymes you’re using. Then mix everything up thoroughly and hold for at least 90 minutes.
If you have access to Ceremix Flex, you can go even simpler: 2 ml/lb Ceremix Flex for 90 minutes at 175°F. This should give decent conversion and fermentability for any grain bill imaginable.
Grain and grist
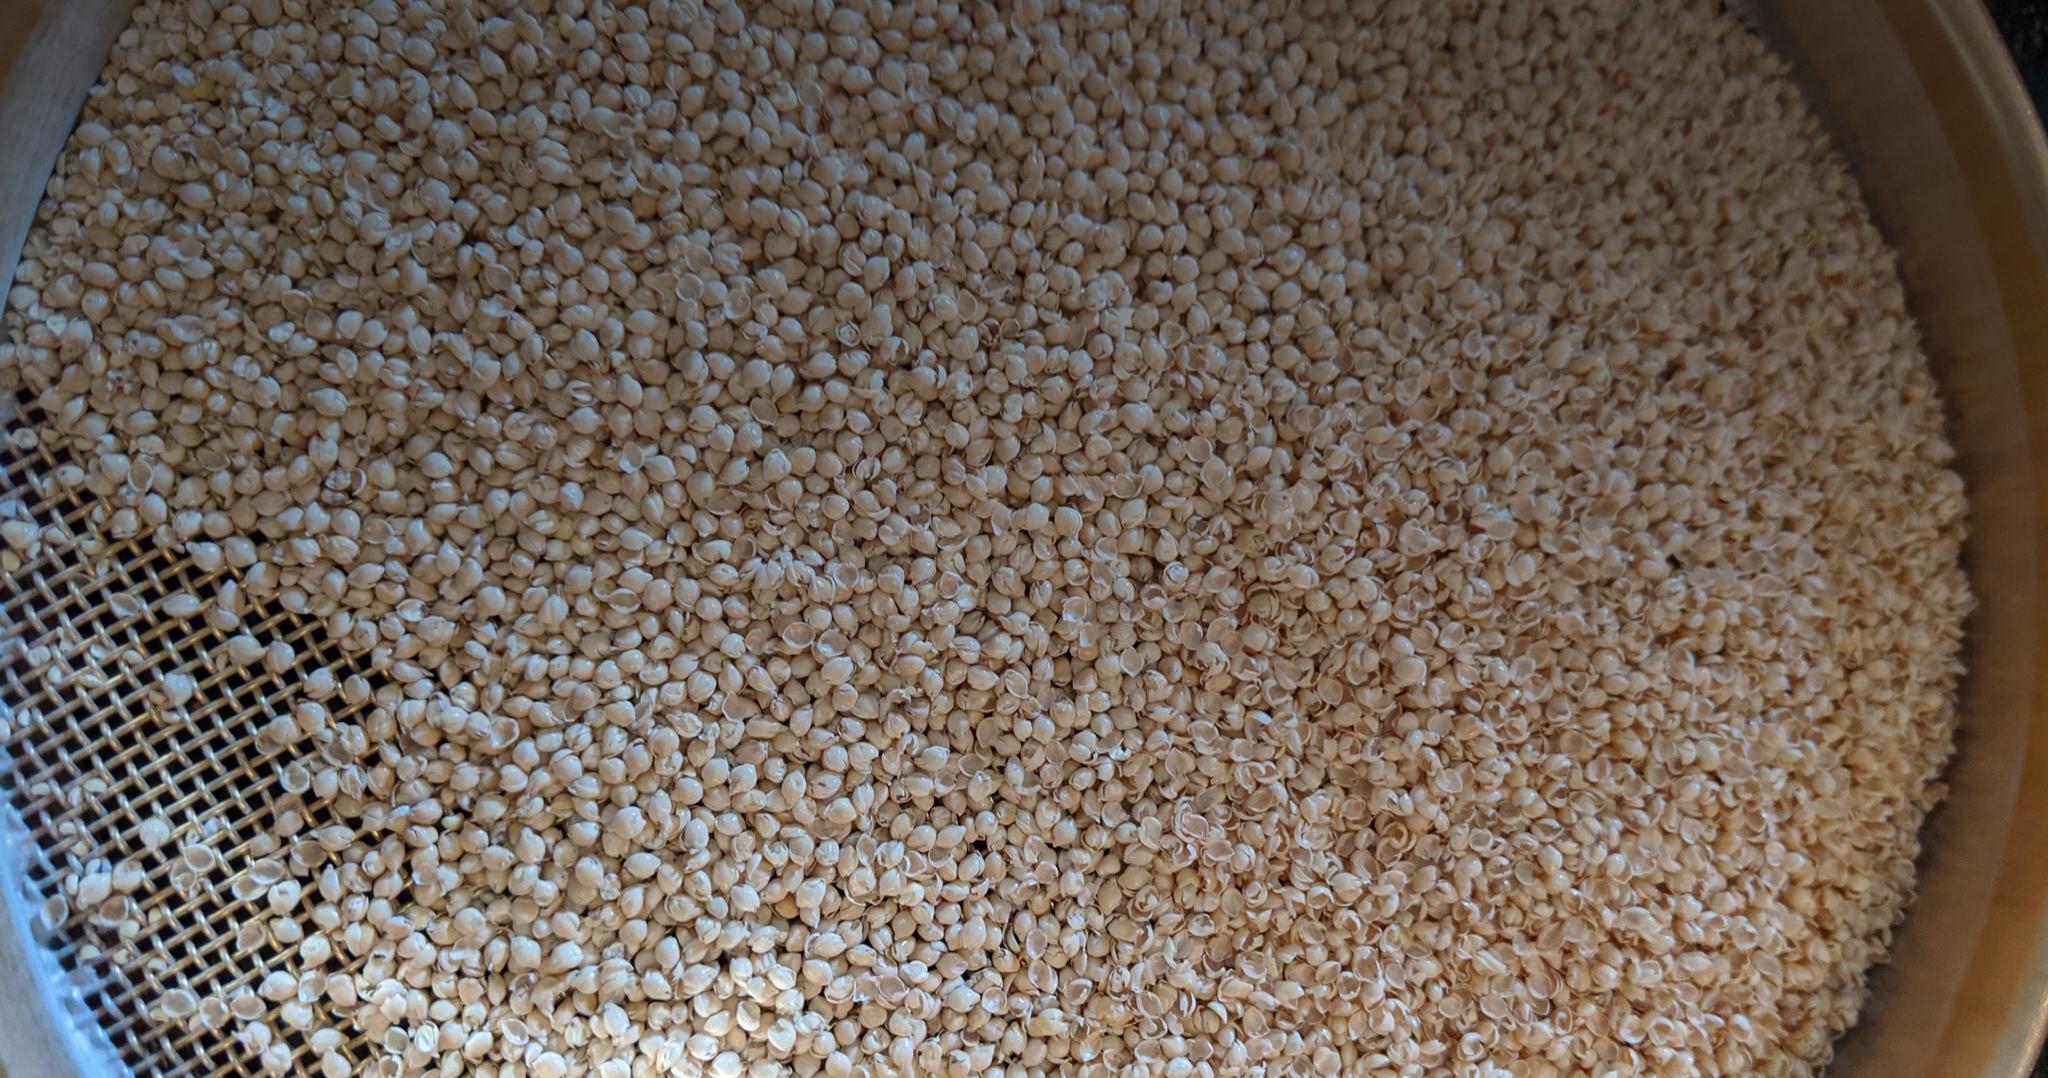
Not all starch is created equal. The types of grains used, as well as the way they’re milled, can affect how difficult it is for your enzymes to find appropriate binding targets in your grist.
About a year ago, I compared the yield and fermentability of various types of rice; some milled, but most mashed whole without any crushing. (Why I did this is another story and not directly relevant to our question.) Despite identical mash and enzyme regimens, including a gelatinization precook, yield and fermentability were all over the map—even for the unmilled grains.
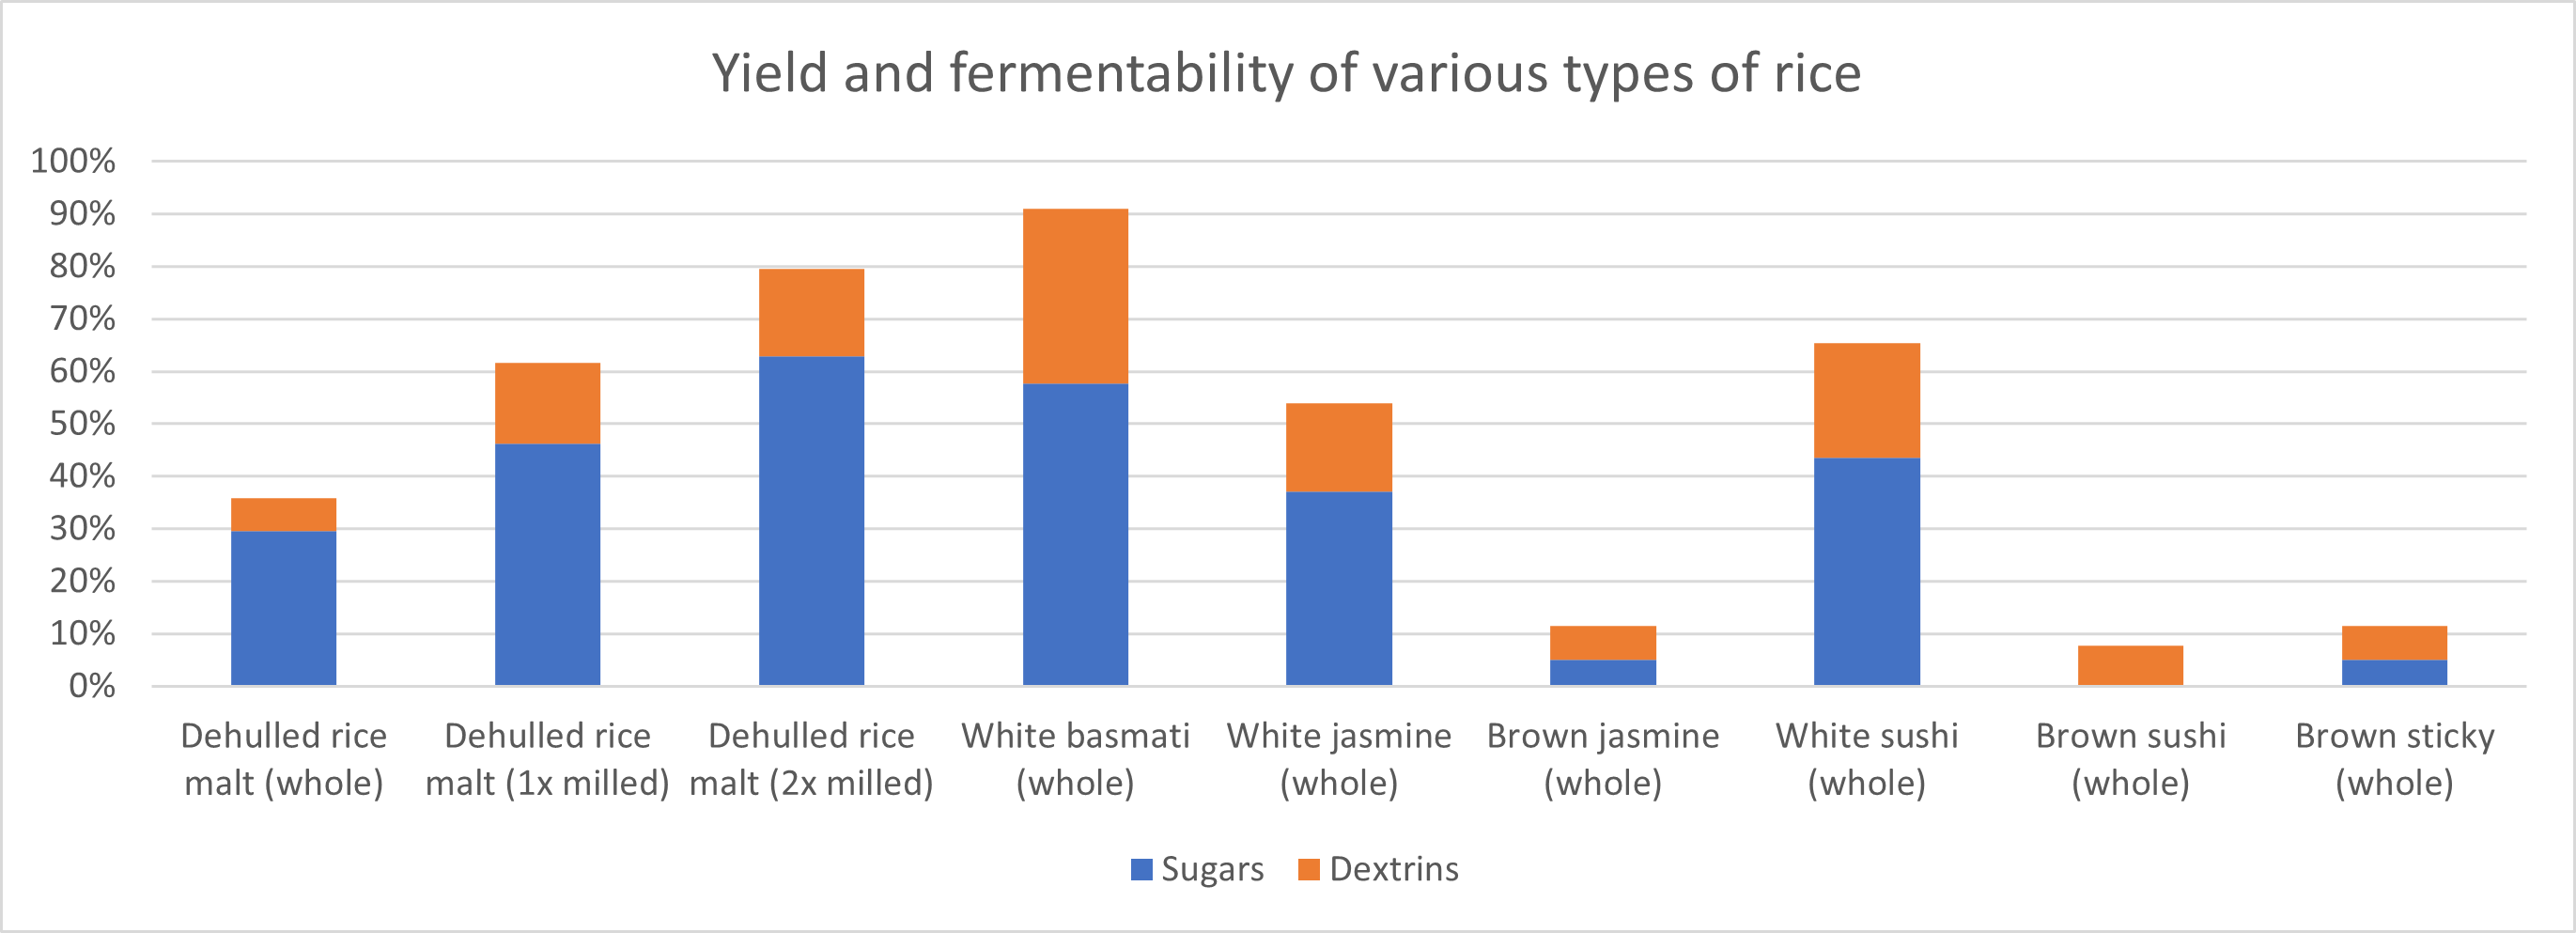
I only tested each combination once, so take these results with a grain of rice (haha), but it is striking to see the range of outcomes.
Apparently white basmati rice doesn’t need to be crushed at all, whereas unmilled brown sushi rice is nearly impervious to mashing. Interestingly, unmilled rice malt seems to yield about 1/3rd of its theoretical maximum, and what it does give you is very fermentable—impressive for what is technically a brown sushi rice. Then as rice malt gets crushed more finely, yield increases, but so does the proportion of dextrins.
The main takeaway: for a given enzyme regimen, extraction of sugars is highly dependent on the innate characteristics of the grain and how it is milled. Therefore, efficient enzyme dosing requires you to first optimize your crush. If you haven’t done that, your results will be somewhat unpredictable.
Gelatinization temperatures
A related variable is the fact that GF brewers aren’t always fully gelatinizing their grains.
As I’ve written previously, it is realistic to get 90% yield at 34-35 PPG for all gluten-free grains (or in other words, 31-32 PPG in the kettle). If you’re getting a lot less than this (e.g. 20 PPG for rice or 25 PPG for millet), then either your lautering is less than ideal or you’re not getting your starch entirely gelatinized.
Depending on the grains used, the sugars you do end up extracting from a partially gelatinized mash may not be representative of the whole. I don’t have any data on this, but my guess would be that a partially gelatinized mash would tend to yield a more fermentable wort, since simpler, easier-to-access starches will be the first to gelatinize at lower temperatures.
In this scenario, the enzyme activity may get “masked” by the easy-access starches, leading to very different results across recipes—or even across brew sessions with the same recipe—due to slight variations in mash temperatures and timings.
If you’re finding that your yield and fermentability are very unpredictable, gelatinization is probably the first place you should be looking.
Naturally occurring enzymes
For brewers who use a lot of millet, the natural beta-amylase in the grain can be a factor, depending on the mash schedule. We tend to think of millet as gelatinizing in the 160s, but the reality is that gelatinization is a sliding scale, not an on–off switch.
I once did a test mash on pale millet malt without any enzymes whatsoever, doing a 125–145–175°F step mash over 2.5 hours. I only got about 60% yield, but apparent attenuation was 76%.
This means roughly half of the starch in the millet was gelatinized and converted to sugar by its natural beta-amylase, which works best in the 145°F range and denatures long before 175°F. If you’re mashing at this temperature with millet, you may not need as high of a saccharification enzyme dose to hit your desired attenuation. On the other hand, if you denature the natural enzymes by precooking or mashing in at the 160s or up, then you will need to rely entirely on the enzymes that you add yourself.
I suspect that these natural enzymes are part of the reason why some brewers are able to attain good fermentability (if suboptimal yield) using Termamyl alone in a combined millet/rice mash like the following:
- Precook rice with Termamyl between 180-200°F (liquefies rice starch)
- Chill with cold liquor to 140-150°F (correct range for beta-amylase)
- Add millet and hold for an hour (millet beta-amylase converts some millet and most rice)
Enzyme distribution
One of the advantages of barley brewing is that the enzymes come nicely packaged in each individual kernel of malt, so it’s much easier to ensure that all the starches get touched by them.
When using external enzymes, however, it becomes very important to thoroughly mix the mash to ensure even distribution. Otherwise, you risk having pockets of mash that don’t get touched by enzymes, leading to reduced yield and/or fermentability.
Mixing is less of a problem on the homebrew scale where a sturdy cooking spoon is sufficient to completely turn over the mash. On the commercial scale, however, wort recirculation, rakes, and/or plows become necessary. This is still an area where I am experimenting, but several brewers I have talked to continuously vorlauf their mashes to help with the process.
The Novozymes recommendation is to add the enzymes to the mash liquor after the first third of the grist goes in, to assist with even distribution. I have yet to try this, however, preferring to wait until the grist is entirely added and the pH is in the correct range before pitching the enzymes.
Enzyme denaturing in the mash
This is a big one. Heat and pH can both play a role, but heat is usually the culprit for brewers. At mash temperatures, all enzymes lose efficacy gradually over time. However, some are more sturdy than others.
Classic maltose-generating enzymes like Fungamyl and Sebayml L lose effectiveness extremely rapidly when they get out of their goldilocks ranges, as shown in the chart below. (I don’t have equivalent charts for Sebamyl L, but my experimental data shows that it’s more or less identical.)
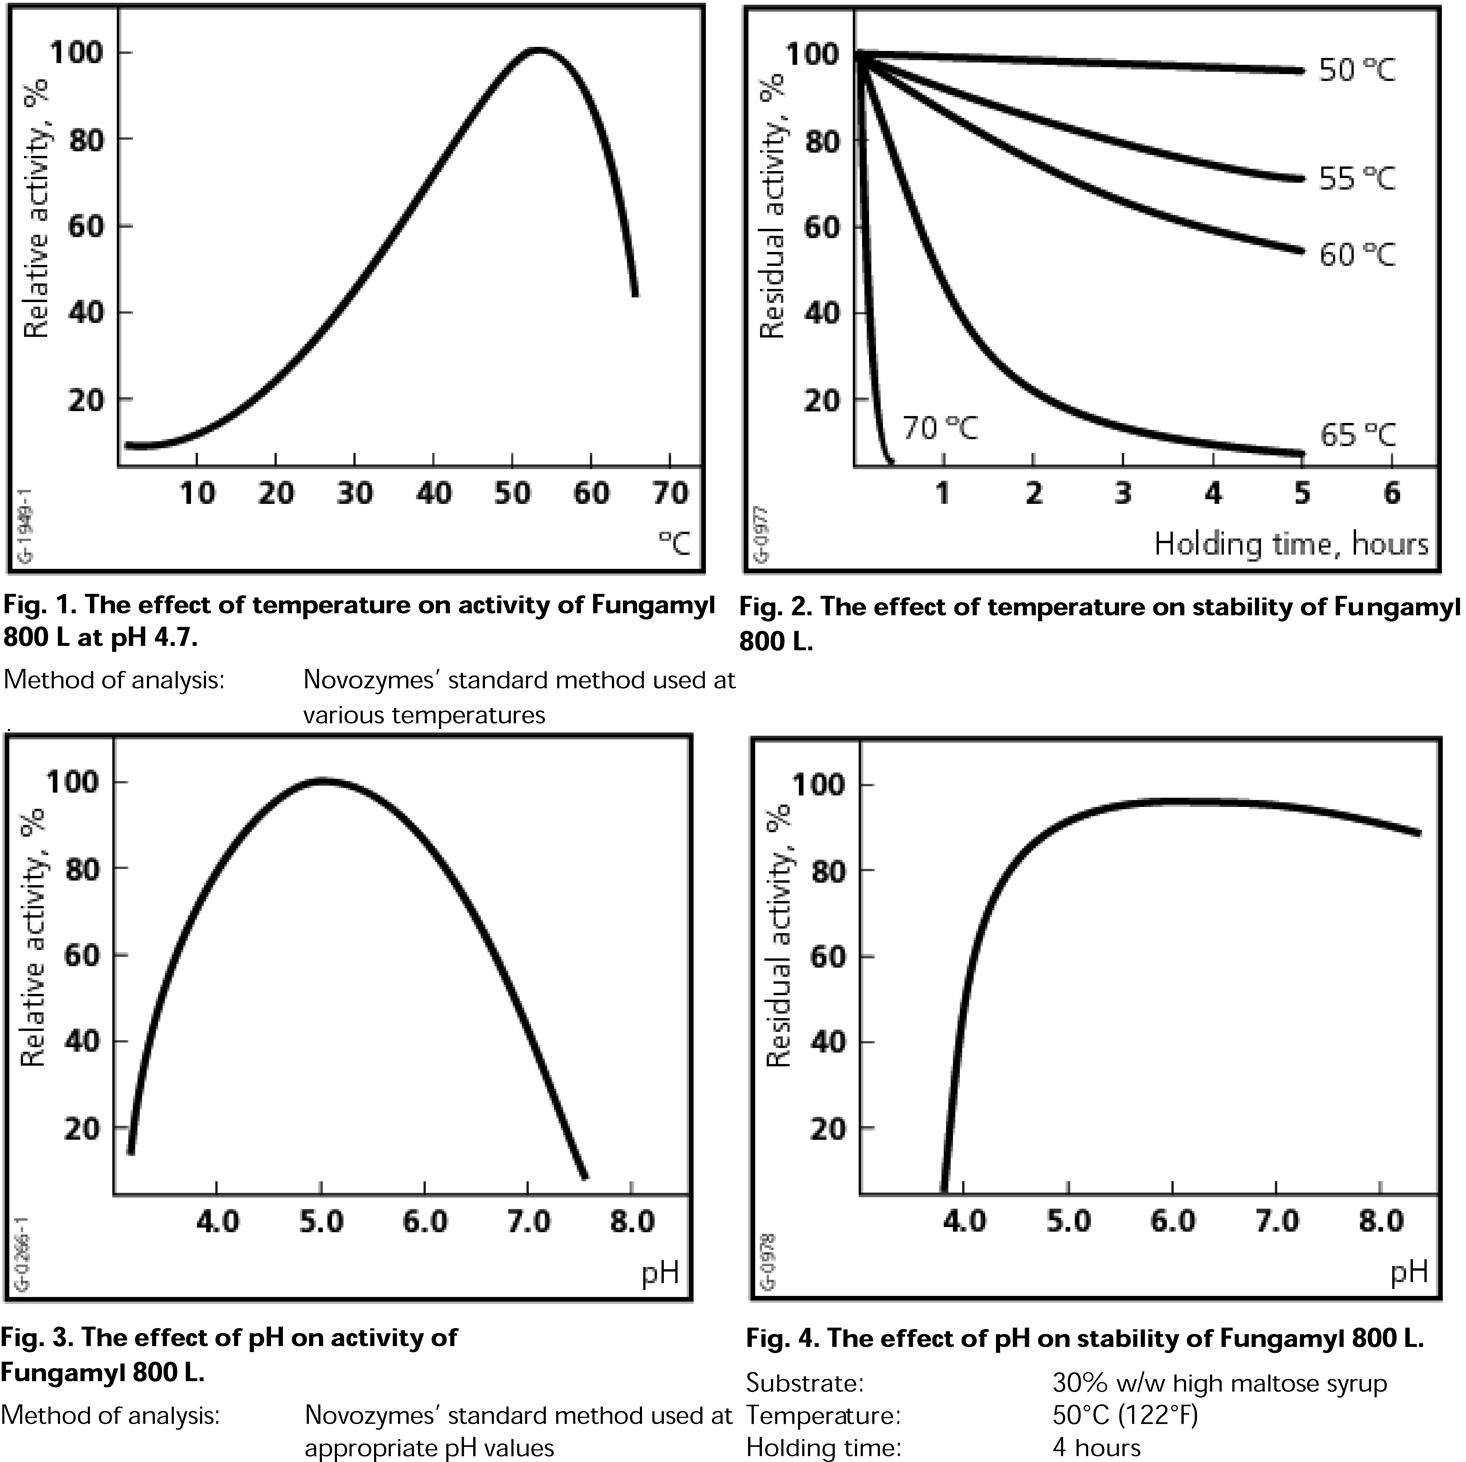
As you can see, at 70°C (158°F), Fungamyl loses about half its effectiveness in the first 5 minutes or so and is completely inactivated in under 30 minutes. At 65°C (149°F), effectiveness drops to 50% over the course of the first hour. And that’s for starch that has already been gelatinized. If you’re adding these enzymes at these temperatures before starch gelatinization is complete, you’re literally pouring money down the drain.
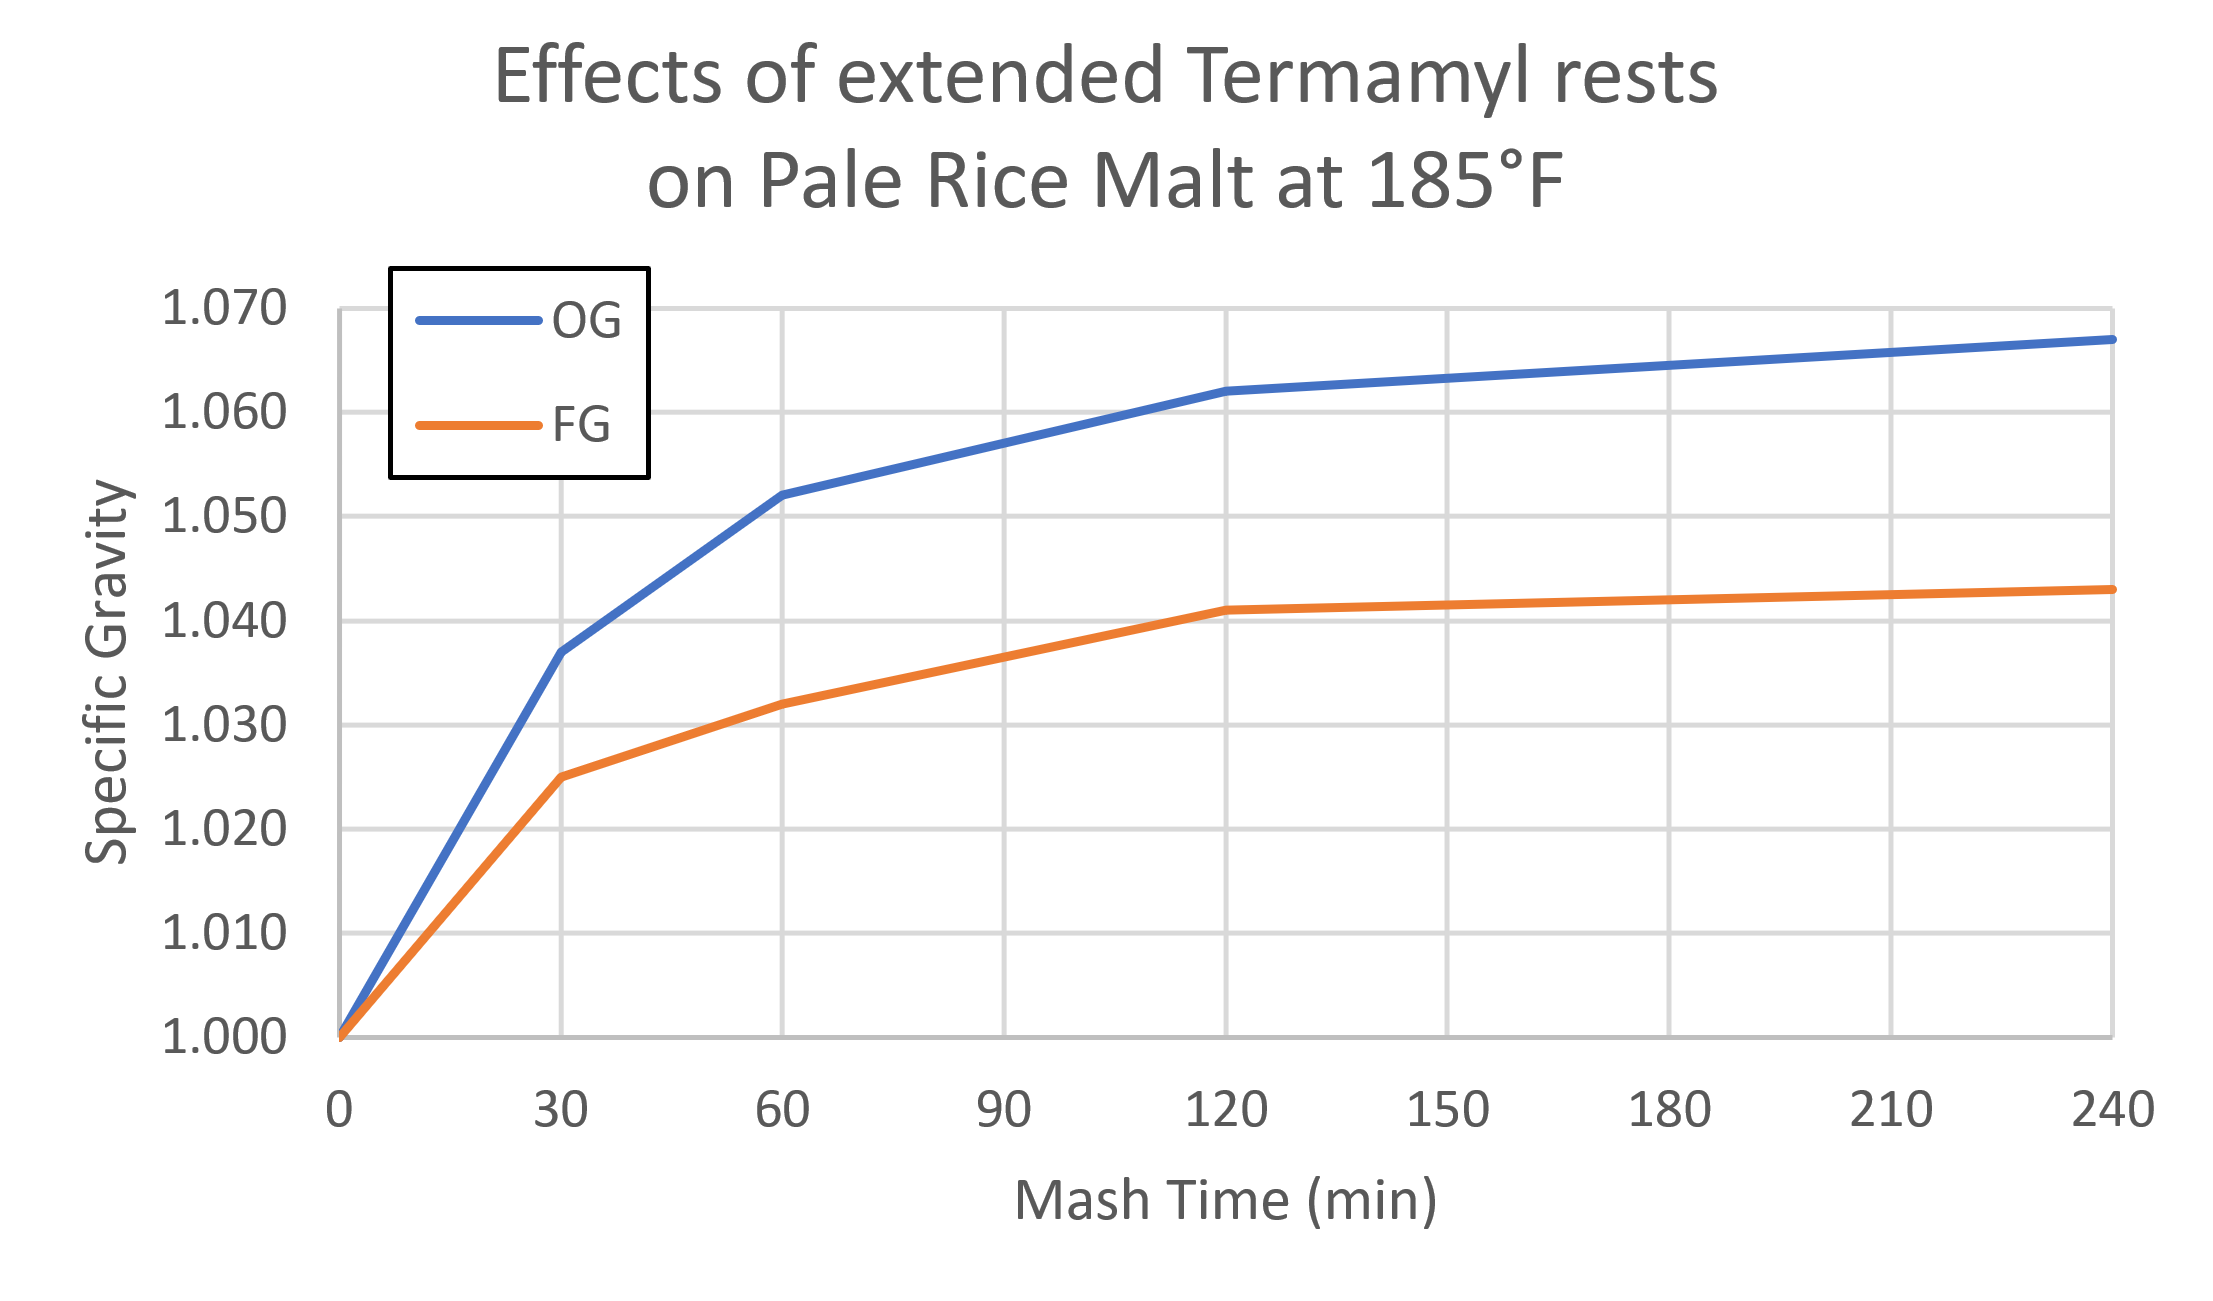
Looking at more thermostable enzymes, something like Termamyl will continue to work effectively for hours. I’ve done upwards of 4 hours at 185°F and continued to see yield increase. This makes sense, because the enzyme was designed with temperature stability in mind.
Ceremix Flex falls into more of an intermediate category. Novozymes does not publish charts equivalent to those for Fungamyl, but my experimental evidence shows that Ceremix Flex is definitely heat stable for 3+ hours. However, what is less clear is how enzyme activity degrades over that period and at what temperature Ceremix Flex begins to denature more rapidly.
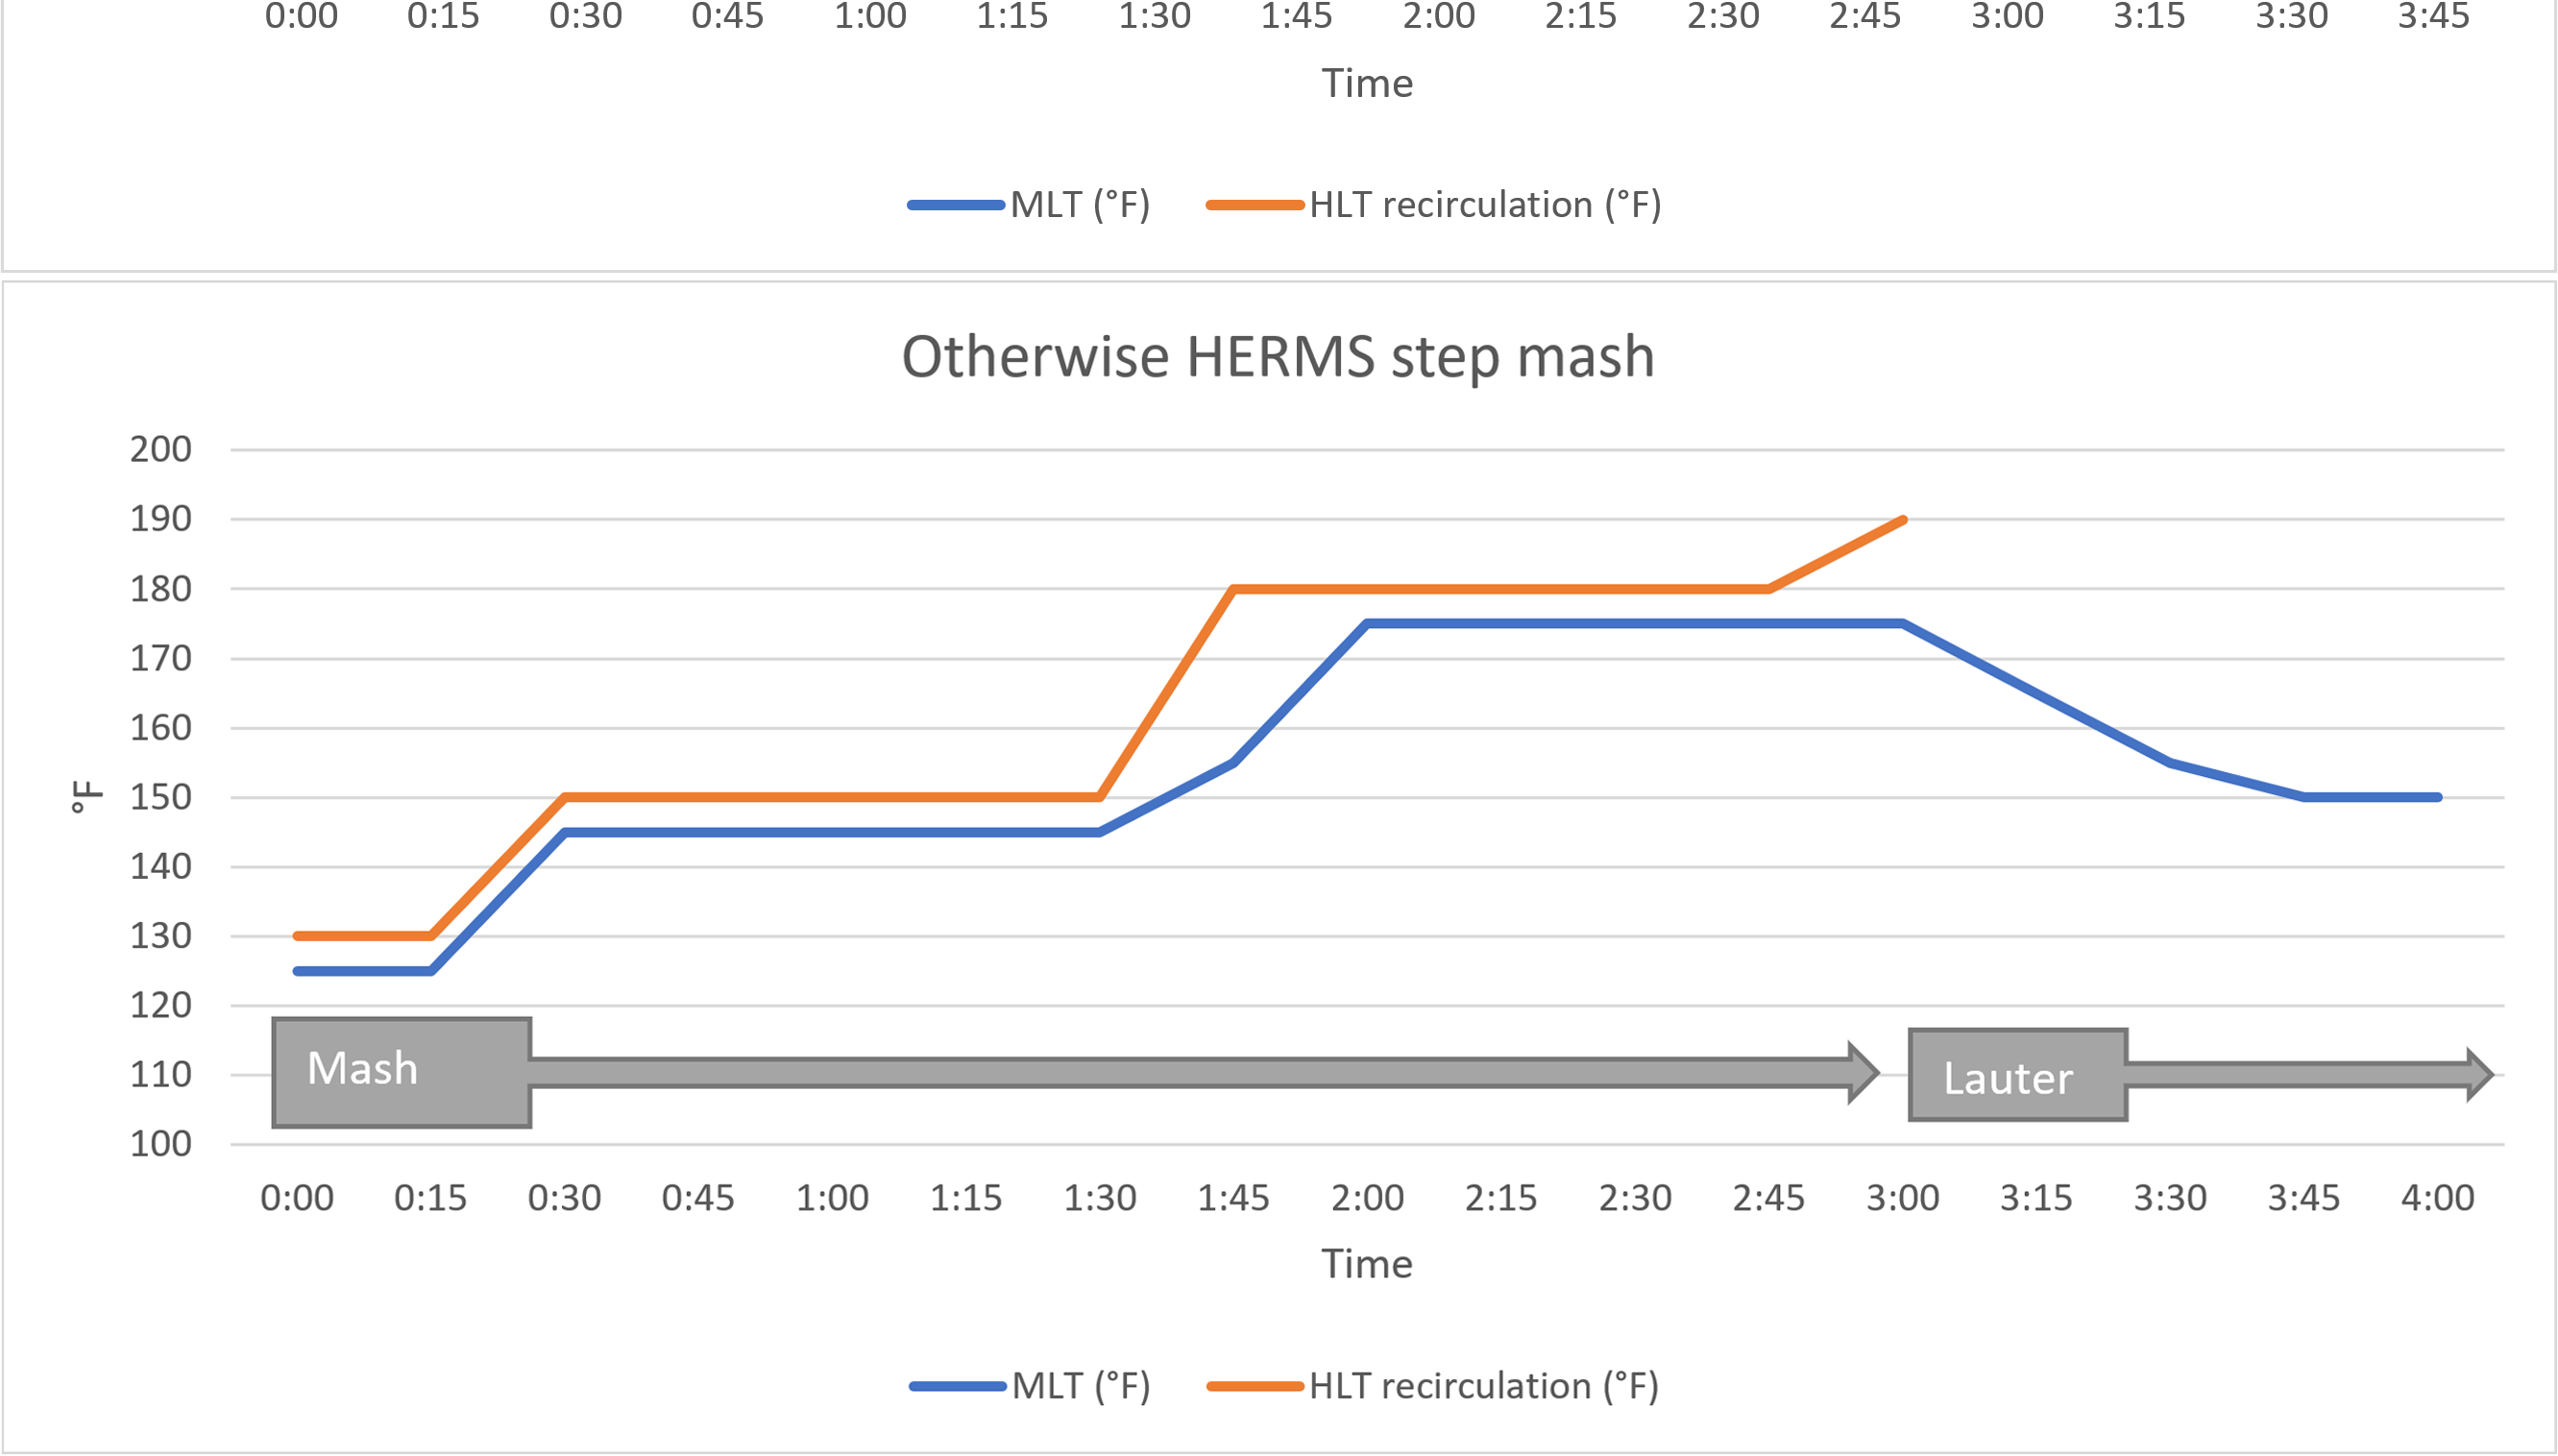
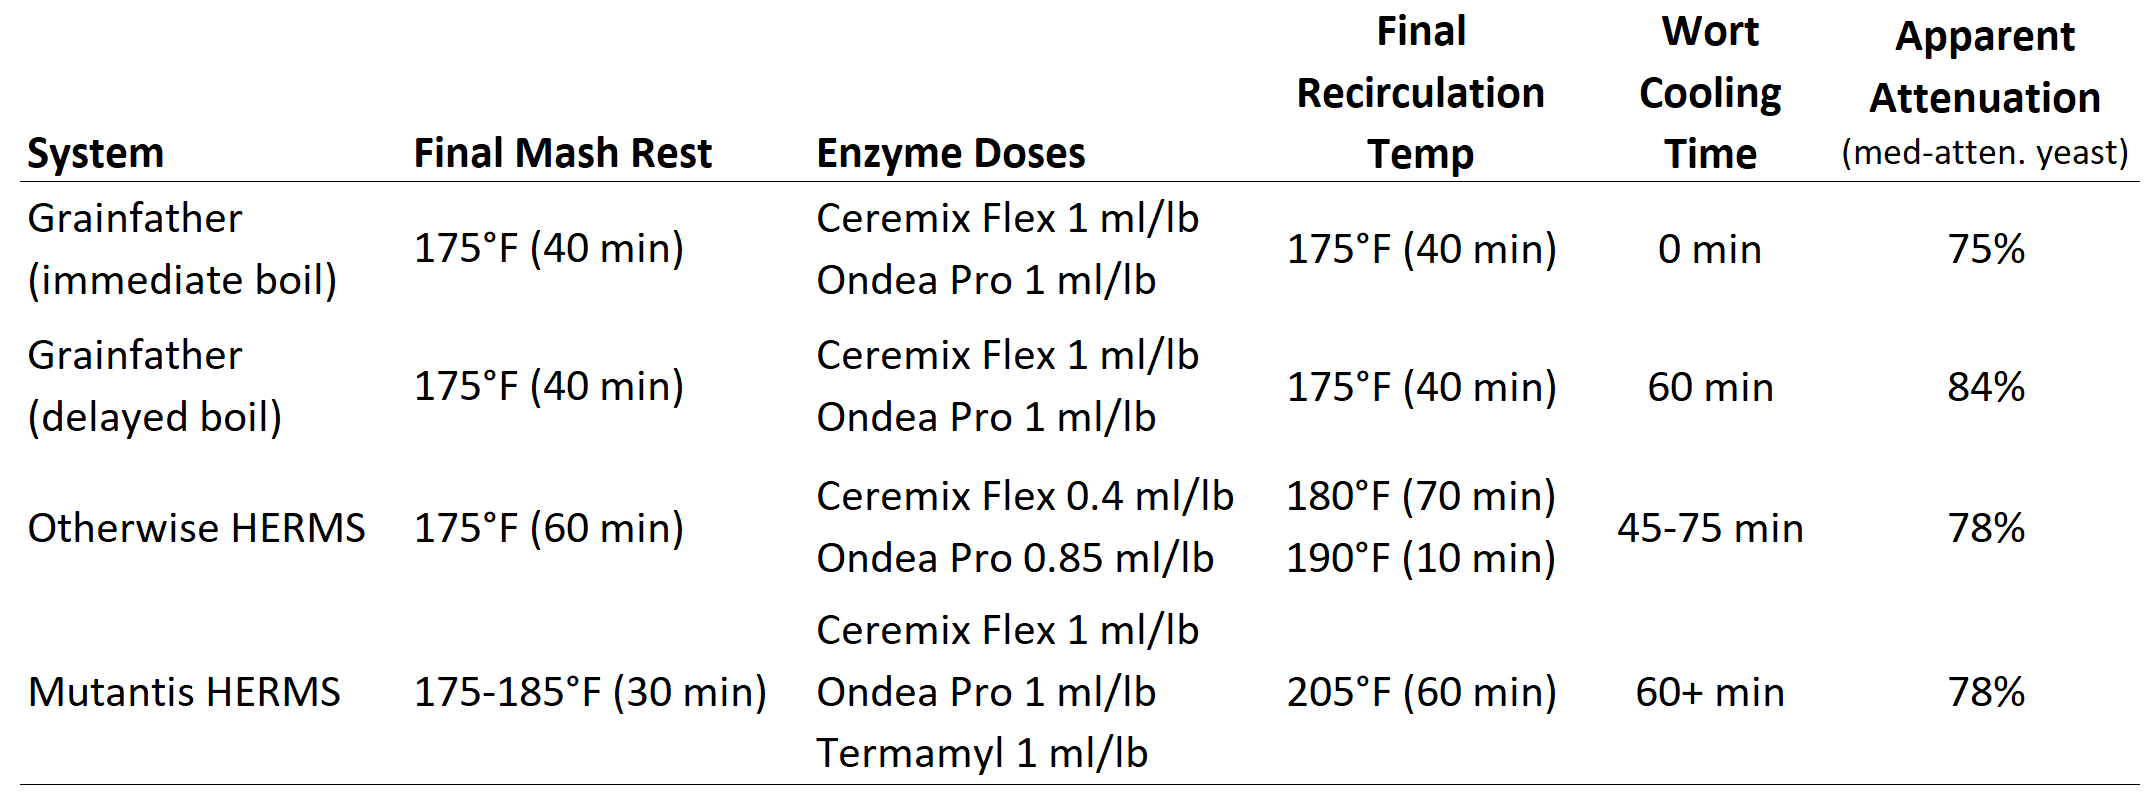
On my HERMS pilot system, I have consistently been able to get away with Ceremix Flex doses 50% or less of what most people use, with the wort recirculating through 180°F water during the final hour of the mash and then briefly through 190°F water during vorlauf.
In contrast, Jason Yerger of Mutantis tells me that he needs to use double my Ceremix Flex dose on his HERMS, but the final rest is recirculated through hot liquor just below the boiling point. Despite the fact that his final rest is shorter than mine, the high temperature recirculation seems to be denaturing Ceremix Flex, for reasons I’ll explain below.
Heat denaturing is also a problem on my production system. The steam jackets on the mash tun appear to create enough localized heat to significantly reduce the activity of Ceremix Flex over the course of the mash, so doses that work on my HERMS are insufficient at a larger scale.
Enzyme carryover in the kettle
The flip side of enzymes being denatured in the mash is enzymes continuing to work as they drain into the kettle—so long as the wort is not heated to the denaturing point.
This is a phenomenon that I have a lot of experience with. On my HERMS, I am unable to start heating the kettle until most of the wort is drained into it, so my wort cools naturally as I lauter. And as it turns out, carryover enzyme activity during the lauter is responsible for the lower dosage requirements of my pilot system.
I did an experiment recently to prove this. I pulled samples of wort from the mash and kettle at various stages of a given brew session, boiling them immediately, and running fast fermentation tests on them. I conducted this experiment on two brew days, and although each brew session used different enzyme doses (to get to different final gravities), the underlying pattern of fermentability was exactly the same both times.
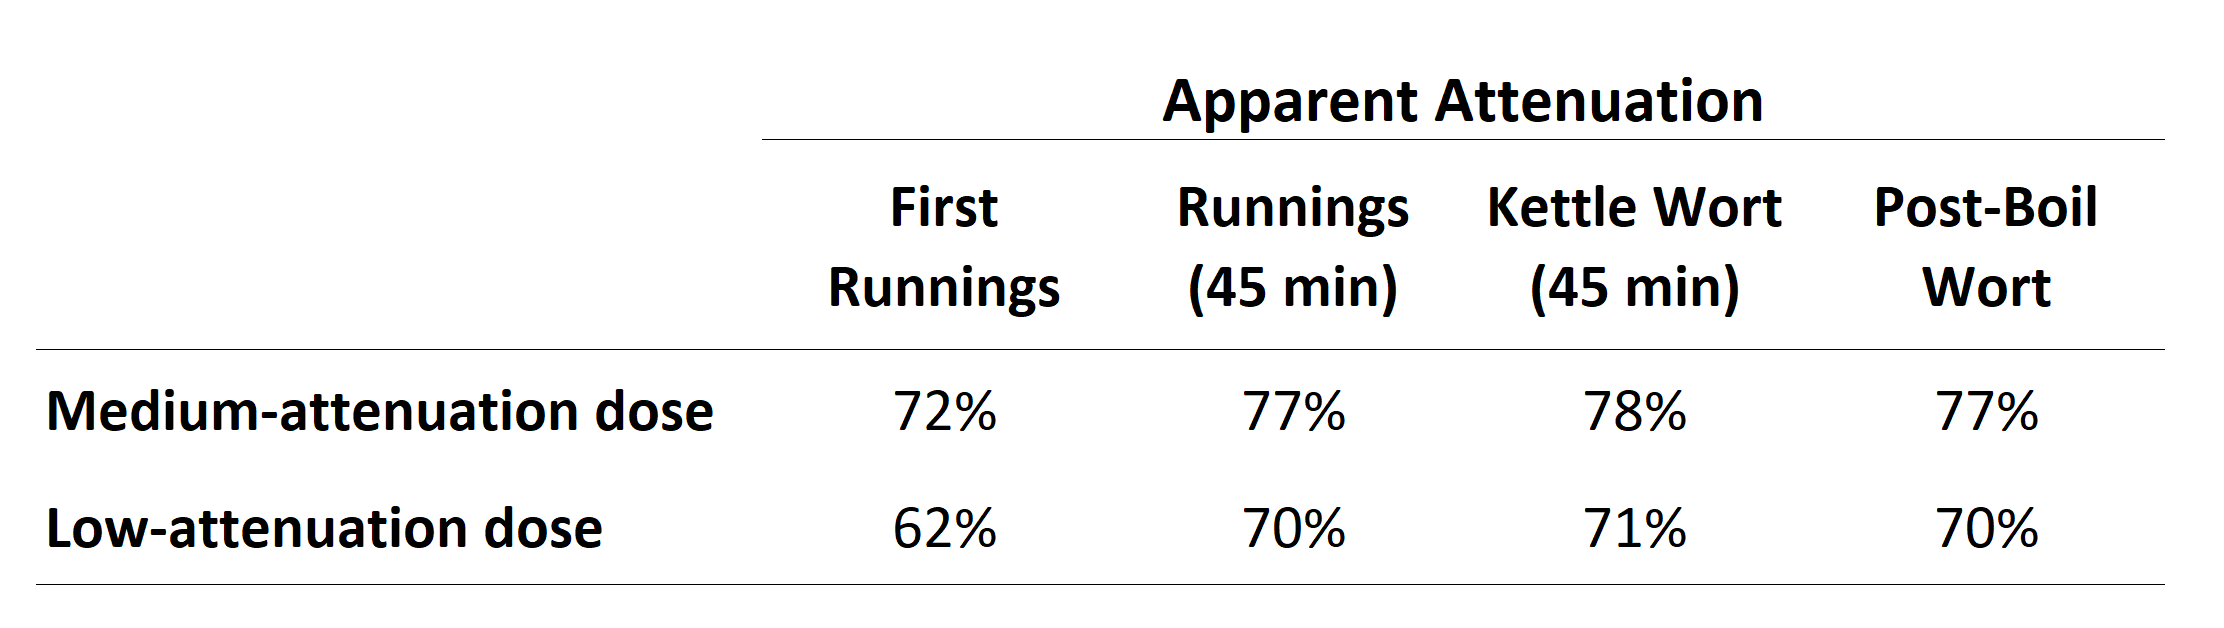
Most of the saccharification happens during the mash, but a significant bump also occurs in the first 45 minutes of lautering. The fact that both the 45-minute runnings and kettle samples are equally fermentable shows that the effect takes place simultaneously in both mash tun and kettle.
Strangely enough, Jason Yerger does not experience any carryover enzyme activity on his HERMS, despite the fact that he also allows his wort to cool during lautering. At first, that’s a confusing result, but it actually makes sense if Ceremix Flex is being denatured by his high recirculation temperature. Denaturing also explains the lower fermentability on my production system, where the steam jackets have to run continuously for nearly two hours.
To further confirm this relationship between carryover activity and denaturing temperatures, I asked homebrewer Shawn Halpin, via the Zero Tolerance gluten-free homebrewing group, to conduct an experiment. Shawn has a single-vessel Grainfather brewing system. Normally, he uses doses similar to Jason’s, and at the end of the mash, Shawn removes the grain basket and immediately boils the wort. I asked him instead to wait an hour between pulling the basket and boiling the wort. As expected, this led to a big boost in fermentability due to carryover activity.
Recommendations
With anything as complicated as enzyme interactions, there are probably countless other variables yet to be uncovered, but the factors above seem to explain the majority of the differences seen between different brewers. To summarize, then, here are a few things to consider when fine-tuning dosages for your system.
Optimize your grist – Take a look at my article on milling gluten-free grains and do a bit of experimentation to find the right grind for your recipes. If you’re starting from a point where all of the grain starch is accessible, you’ll have a consistent baseline that can help you build dosages that work across recipes.
Keep your mash moving – There is some debate in the barley world about whether it’s better to stir a mash or leave it alone, but it seems pretty uncontroversial for gluten-free brewing that the more stirring you do, the more likely your enzymes are to be properly distributed.
Work in your enzymes’ heat ranges – The optimal ranges for natural malt enzymes are well known, and those for commercial enzymes are generally published online. Try to design your mash to match those ranges. Of course, you may have to make some compromises for the sake of gelatinization, but if you’re more than 10°F / 5°C above the top range, it’s probably not worth using that enzyme.
Look for unplanned hotspots – Is your wort recirculating through very hot liquor? Are your steam jackets causing boiling around the edges of the mash? Is the element in your RIMS scorching the wort as it heats it? All of these can decrease enzymatic performance.
Plan around carryover activity – If you use temperature-stable enzymes, particularly Ceremix Flex, consider how long your wort will sit and cool before the boil, as any non-denatured enzymes will continue to work as you lauter.