

Gluten-free mashing is a bit of a Wild West situation. Whereas barley brewers have centuries of tradition and science to guide their work, we mostly have to figure it out on our own, going off our experiences and whatever scraps of information we can find online.
That’s why, in preparation for the launch of Otherwise Brewing, I’ve been spending a lot of time doing research and conducting mash experiments. Through the process, I’ve been able to significantly improve both the speed and efficiency of my mashing, and I wanted to share some of those insights with the gluten-free brewing community.
I’ll be detailing my work in a series of posts, but to start, I decided it might be helpful to highlight a few common bits of mashing wisdom that turn out to be more myth than fact.
Gluten-free grains lack enzymes
It’s true that barley has an unusually high concentration of enzymes (due to selective breeding), but most malted grains should have enough enzymes to convert their own starches. After all, the starch is there to feed the growing seedling. If the grain didn’t produce enough enzymes to convert its starch, why bother storing it?
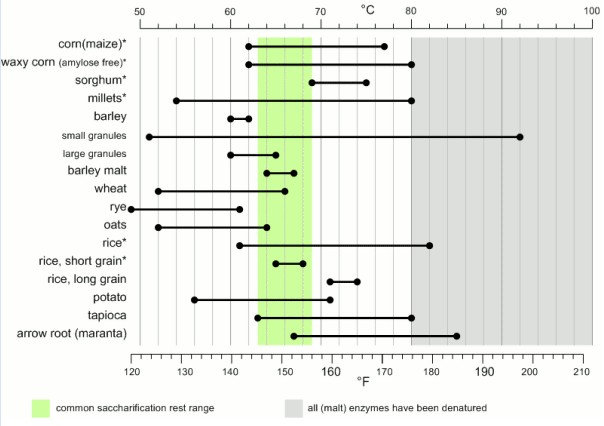
No, the reason that barley, wheat, and oats are the trifecta of traditional brewing is their low gelatinization temperatures. They are all in the range of 140°F (60°C) or lower, which are good temperatures for natural plant amylases to do their thing.
Our challenge in GF brewing is that, in many other grains, the starch does not fully gelatinize until you hit higher, enzyme-denaturing temperatures. Yet good gelatinization is key to good mashing. Amylase enzymes work very slowly on non-gelatinized starches—on the timescale of days—which is fine from the plant’s perspective but not great for making beer.
That means your first priority in designing a gluten-free mash is to figure out how to get your starch gelatinized. Only then should you turn your attention to selecting and dosing enzymes, whether that means using commercially available preparations, doing a decoction mash, chewing the mash chicha-style with your friends, or whatever else you might dream up.
Mashing requires alpha and beta amylase
“α-amylase gives you dextrins and β-amylase gives you fermentable sugars.” This is a shorthand that’s close enough for barley brewing, but it will lead you to frustrating dead ends in GF brewing.
I’m going to write another post explaining starch chemistry in more detail, but the bottom line is that there are many kinds of commercially available enzymes that can make a useful wort. Most of them are forms of α-amylase. True β-amylase is hard to find, but it turns out that you don’t actually need it. You can make glucose, maltose, dextrins and more in all sorts of combinations using the various α-amylases.
To understand how, we need a quick primer on how starch works.
All starch is made up of chains of glucose, the smallest possible sugar. Each glucose has six carbons, and glucoses connect to each other at the carbons to make longer chains. Long, straight chains are called amylose and connect carbons 1 to 4 (α-1,4-glycosidic bonds). Branched chains of amylose are called amylopectin, and the branches are formed at carbons 1 and 6 (α-1,6-glycosidic bonds).
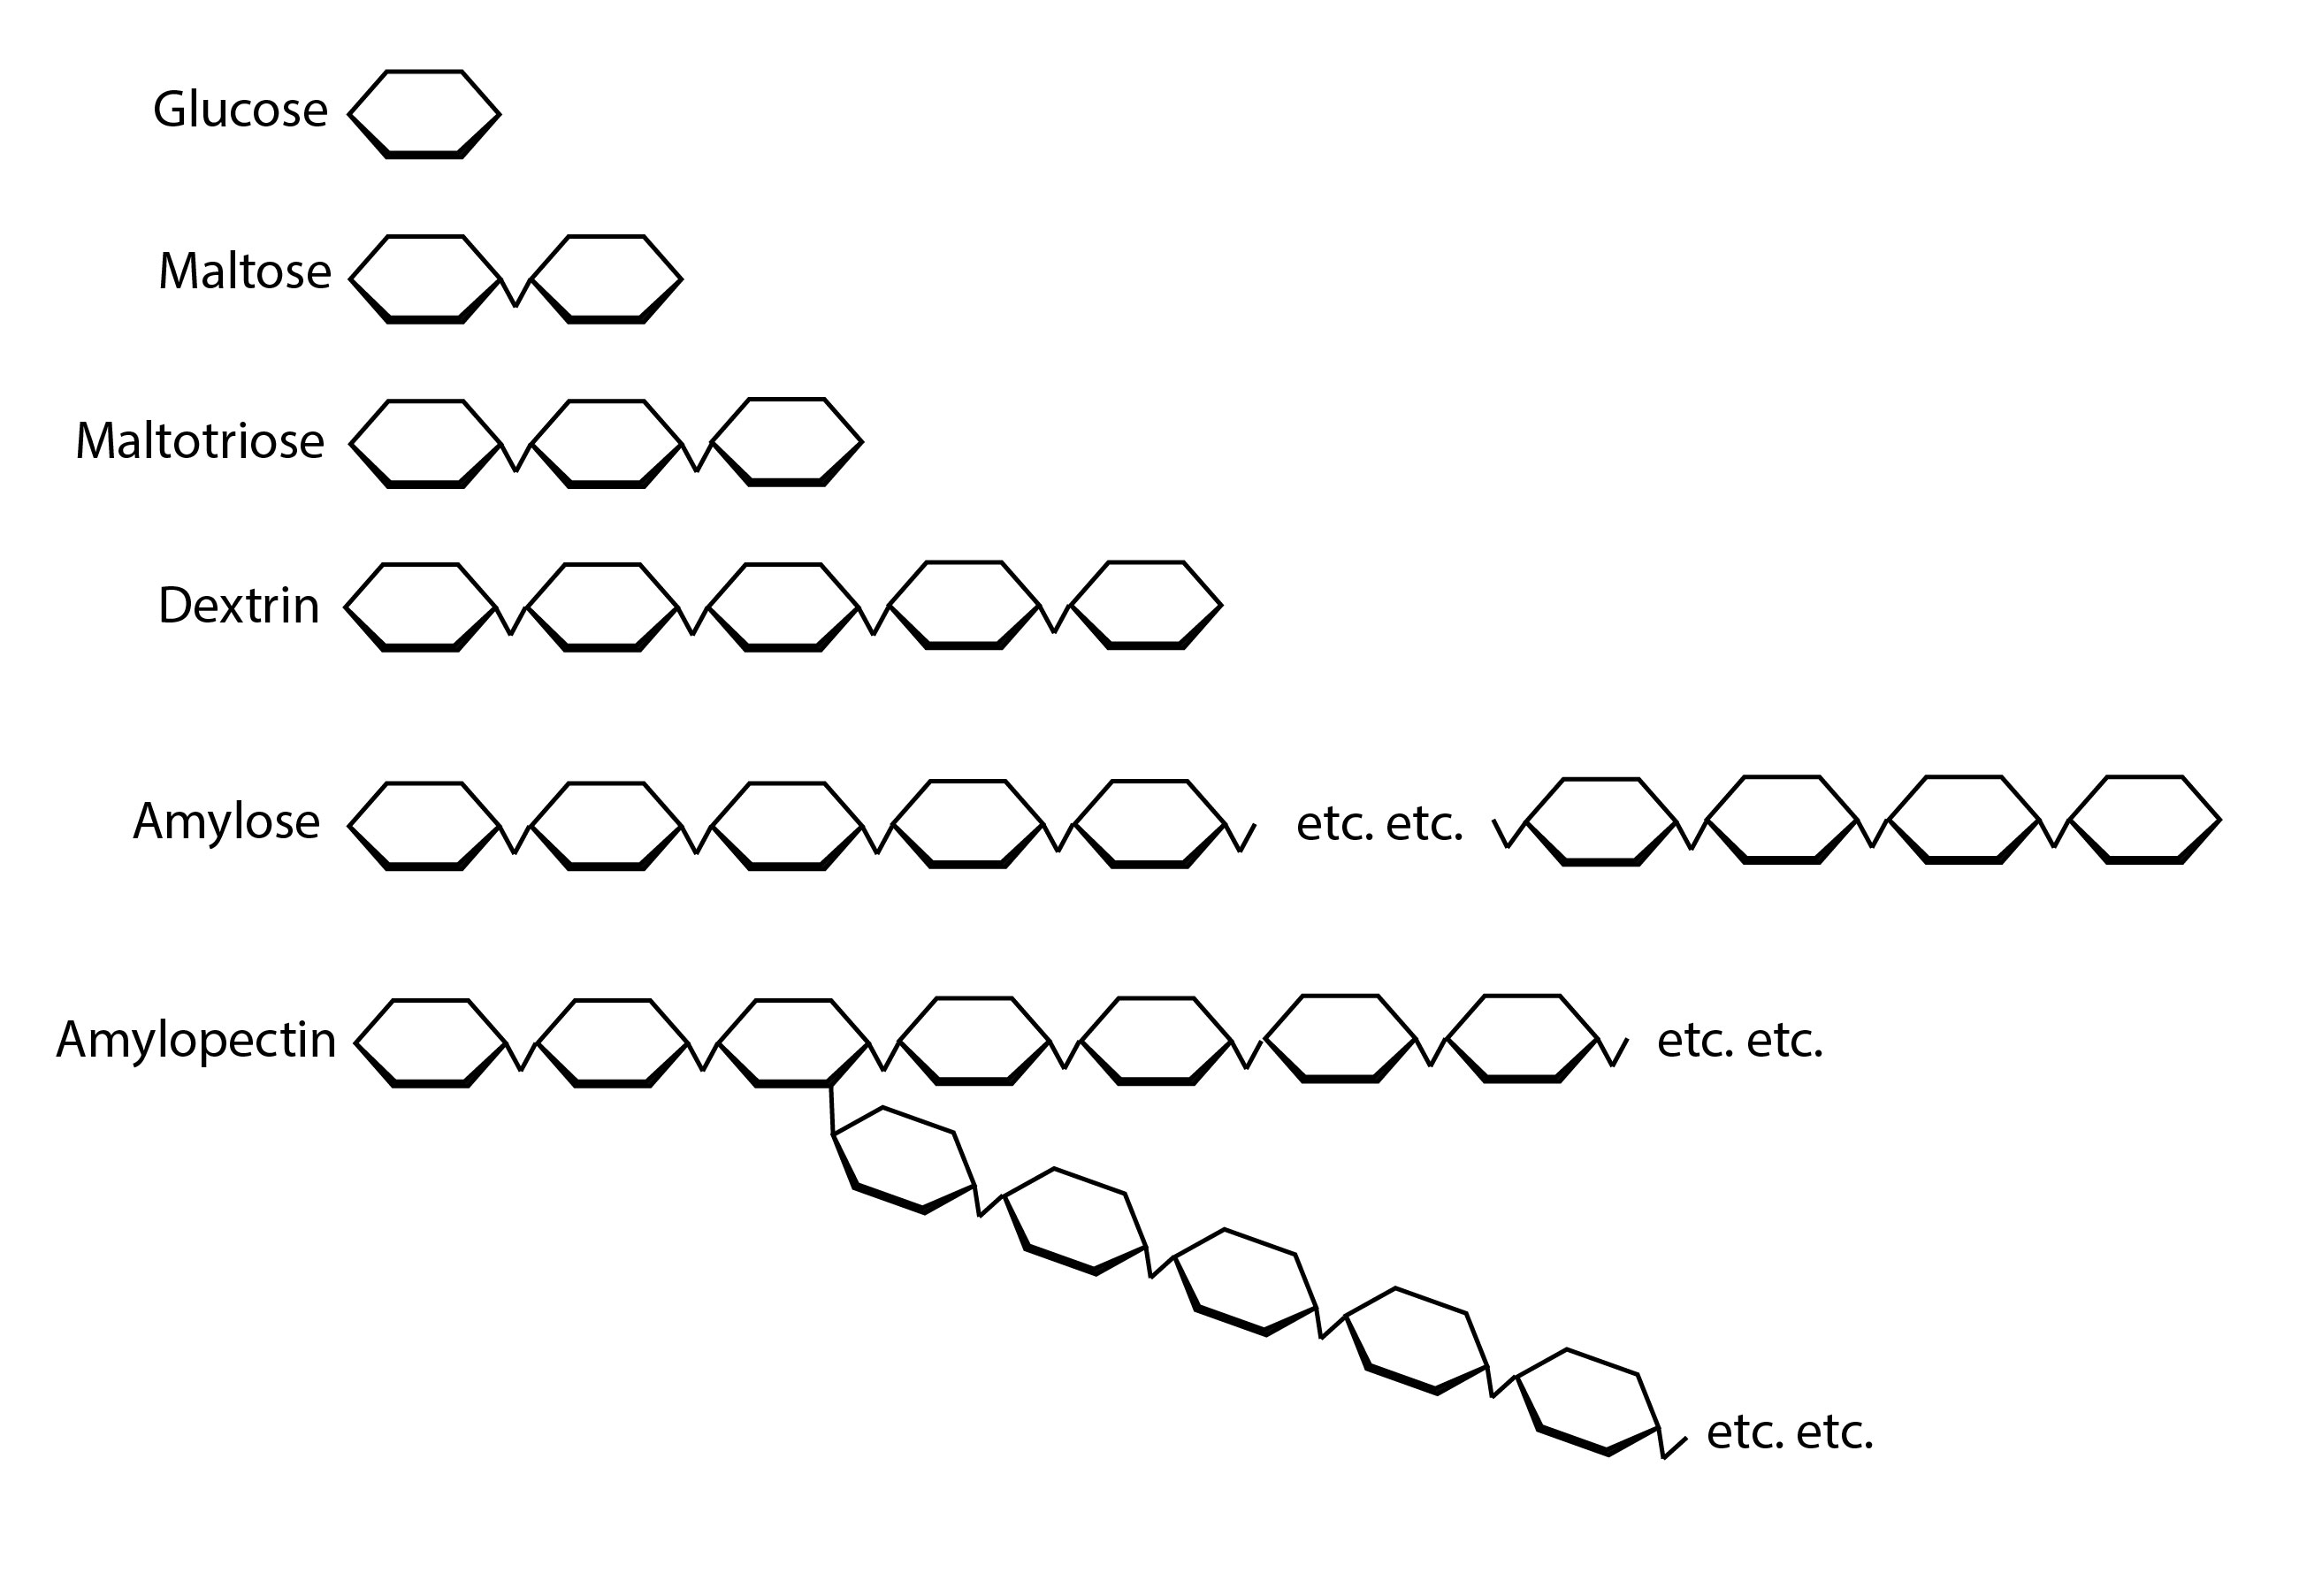
These are both alpha bonds. β-glycosidic bonds are a thing too, but they’re used by the plant to make cellulose, so beta bonds don’t apply to us—unless you’re making toilet paper moonshine. What we call β-amylase in brewing is called 4-α-D-glucan maltohydrolase in biochemistry circles, and it works on alpha bonds. So just forget about all the Greek letter stuff; it’s not that important to our purposes and is kind of confusing.
Most (not all) brewing enzymes work on the 1,4 bonds, producing various sugars and dextrins. The commonly available enzymes out there will do one or more of the following:
- Break long, gooey 1,4 chains into medium-sized, liquidy 1,4 chains (a.k.a. liquefaction)
- Break 1,6 bonds into 1,4 chains (a.k.a. debranching)
- Turn 1,4 chains into glucose
- Turn 1,4 chains into maltose (2 glucoses) and maltotriose (3 glucoses)
- Attack oils, proteins, and various other plant structures to improve lauterability, wort clarity, mouthfeel, or flavor
Depending on your recipe, you’ll obviously want different kinds of wort. So after you’ve figured out your gelatinization requirements, the next step is to ask yourself what kind of wort you want to make and what temperatures you need to work with, then pick the enzymes to do the job.
This is one area where we have a leg up on barley brewing, because once you understand how starch enzymes work, there’s more than one way to mash. You can change up your procedures based on what you want the recipe to do, instead of where the grain’s natural enzymes work best.
More enzymes gives you better conversion
If you read the dosage recommendations from the enzyme manufacturers, they are typically a fraction of what most online sources suggest for gluten-free mashing. Looking at Termamyl, for example, the recommendation works out to between 3-5 ml for 15 lbs of grain, not the 14-28 ml (1-2 Tbsp) I’ve seen online.
I’ve done a bunch of tests measuring dosage, and I have never seen any benefit to going over the recommendations. I’ve gone as far as 20x the manufacturer’s recommended dosage and gotten exactly the same yield and fermentability as 1x.
I’ve also tried splitting up larger doses into different timed additions, under the theory that maybe the mash temperature is high enough that the enzyme’s activity stops before conversion is complete, such that a “refresher” dose halfway through might help boost output. Again, no difference in yield or fermentability versus the manufacturer’s recommendations.
Assuming you’ve worked out your gelatinization, save yourself some money and use less enzyme. The only thing you really need to look at are the temperature and pH curves for the enzyme. Once you’re in the correct range for those, use a standard dose and you’ll get the maximum effect.

Gluten free malts have much lower PPG than barley
Pretty much every GF malt, including rice malt, gets me kettle yields in the range of 22-27 PPG or higher. Assuming 80% mash efficiency, that puts their potential PPG in the range of 28-34, or about 10-20% lower than most barley malts. Jason Yerger, co-founder of Ghostfish Brewing, tells me he even gets a few points higher than this by using a finer crush.
Below is the yield from a test I did to see what would happen with extended Termamyl rests. As you can see, the 4-hour mash got me a kettle gravity of 1.067 on pale rice malt, which would be an impossible 110% yield if I used the 22 PPG figure I’ve seen online. Assuming it’s actually 80-85% extract yield, then pale rice malt is between 28-30 PPG.
(Note: I don’t recommend a 4-hour mash, and you can get this same yield much faster in other ways. The point is that there’s definitely more sugar in these malts than we’re giving them credit for.)

If you’re not getting good yields, there are a few possible culprits.
The first thing I’d check is your gelatinization. I was getting much lower yields with rice malt until I started moving the temp up to the high-170s / low-180s °F range. Jim Eckert of Eckert Malting tells me he uses calrose rice varietals that should have a gelatinization temperature in the 150s, but I haven’t been able to make those temperatures work. (My guess is that it has something to do with the shape of the starch in calrose, which is a classic sushi rice, bred to hold a firm, chewy texture. Ground very fine, it might actually gelatinize at that lower temperature.)
Next, I’d check your mash bed. Especially with millet or buckwheat, it’s possible for stuff to get gummed up and cause channeling. As the mash progresses, its texture should become “fluffy”: easy to stir with bits of malt floating in suspension throughout. If it’s thickly compacted with a layer of thin liquid on top, it needs more stirring. At the homebrew scale, you’ll definitely benefit from a RIMS/HERMS setup. If that’s not possible for you, make sure you stir your mash every few minutes.
Mashing thick is necessary to avoid diluting the enzymes
As we’ve seen above, you’re probably using too much enzyme to begin with. You also don’t need to worry too much about mash thickness. In one of my tests, I compared three liquor-to-grist ratios, from super dry to super wet. On the dry side, the rice didn’t even look like it was completely wet. On the wet side, I barely got anything out of the sparge. But all three gave similar yields.
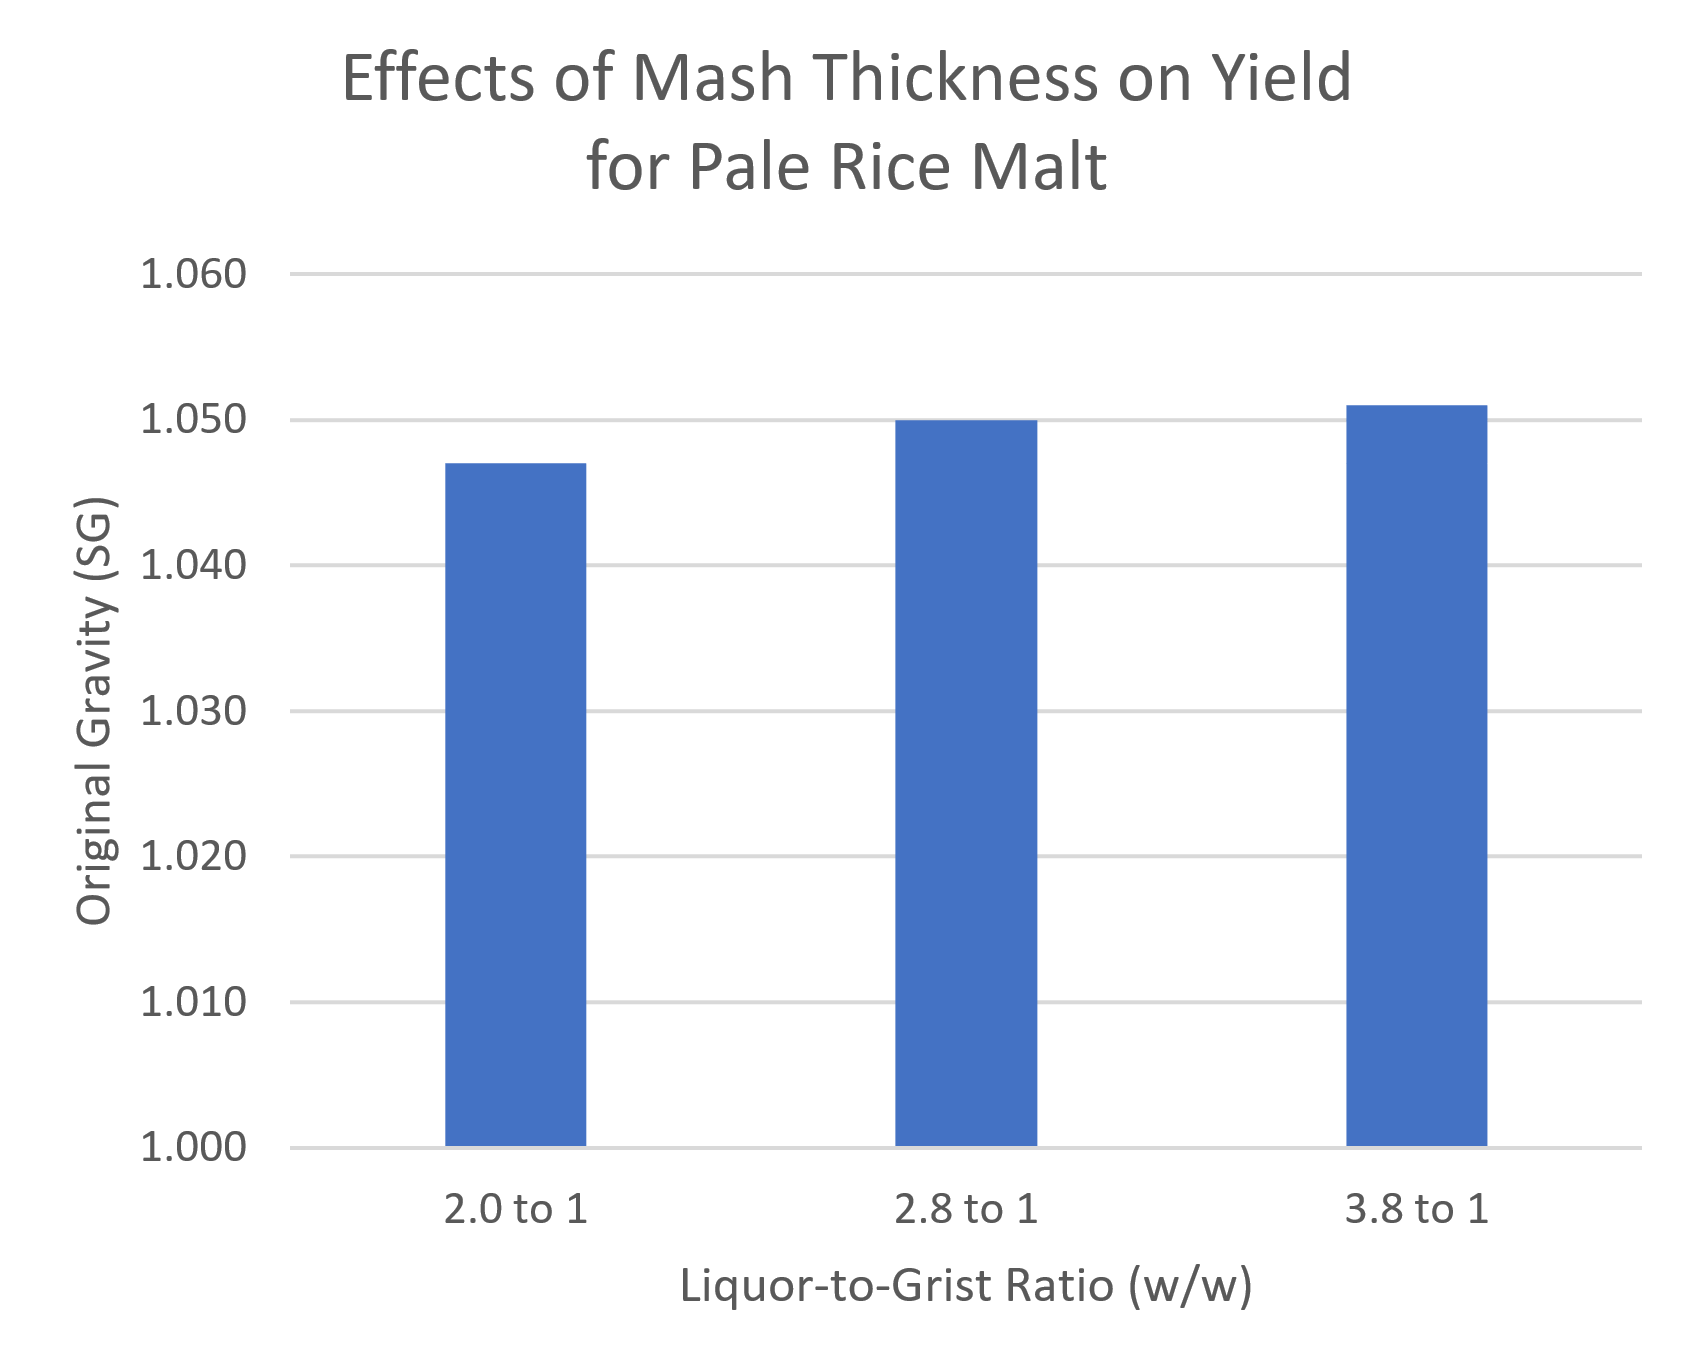
In my own experience, I’ve found it’s easier to get a fluffy mash, and hence better extraction, with a somewhat higher liquor-to-grist ratio. I’m usually aiming for around 1.5 qt/gal (3.1 lb/lb).
That’s it for now, but I’ll go into more details on these topics and others in subsequent posts. Hopefully there is enough detail in here to get you thinking about what you personally can do to improve your mashing process.
Also, if you have experiences that complement or contrast with mine, shoot me an email—I’d love to hear about them!


